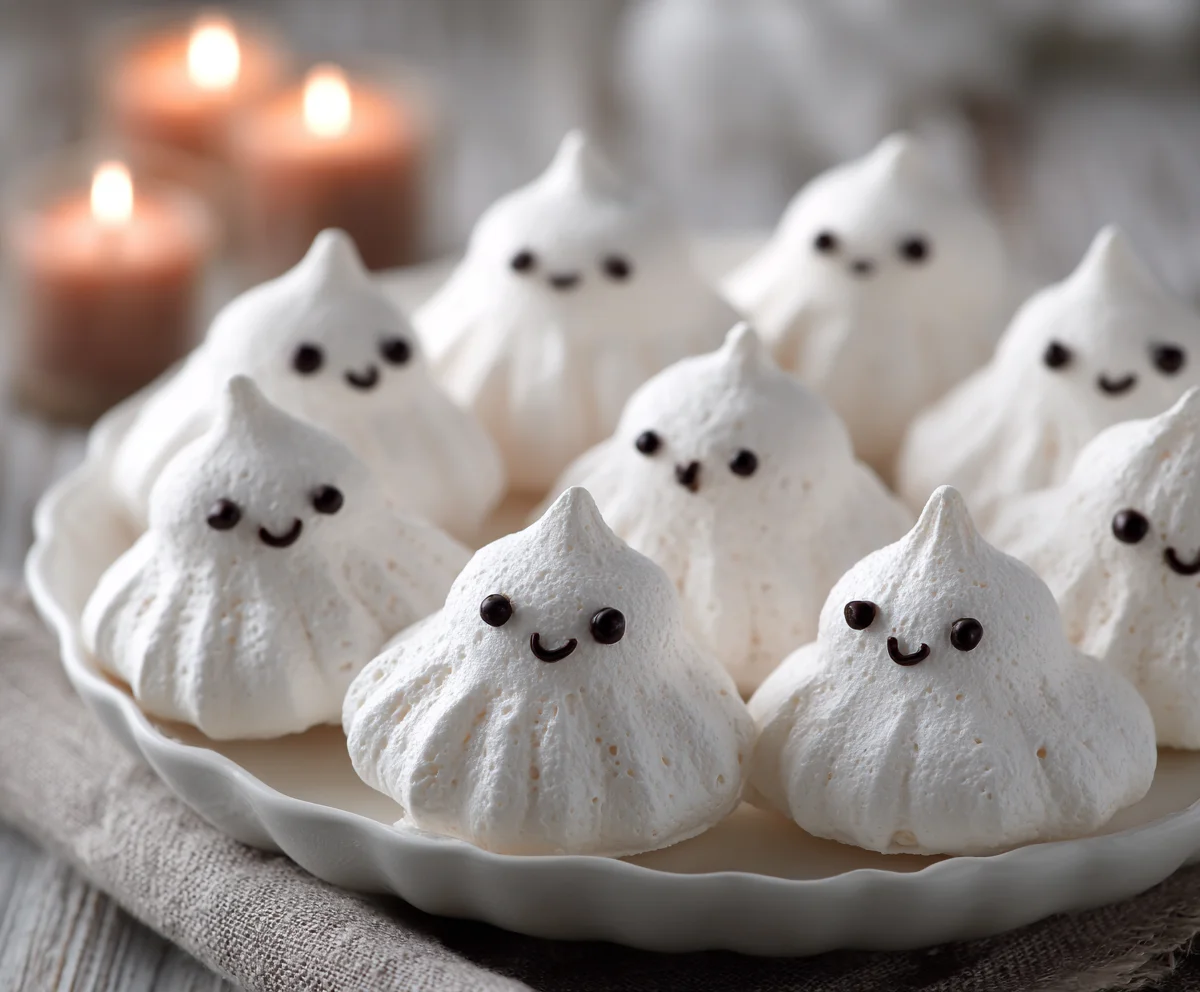
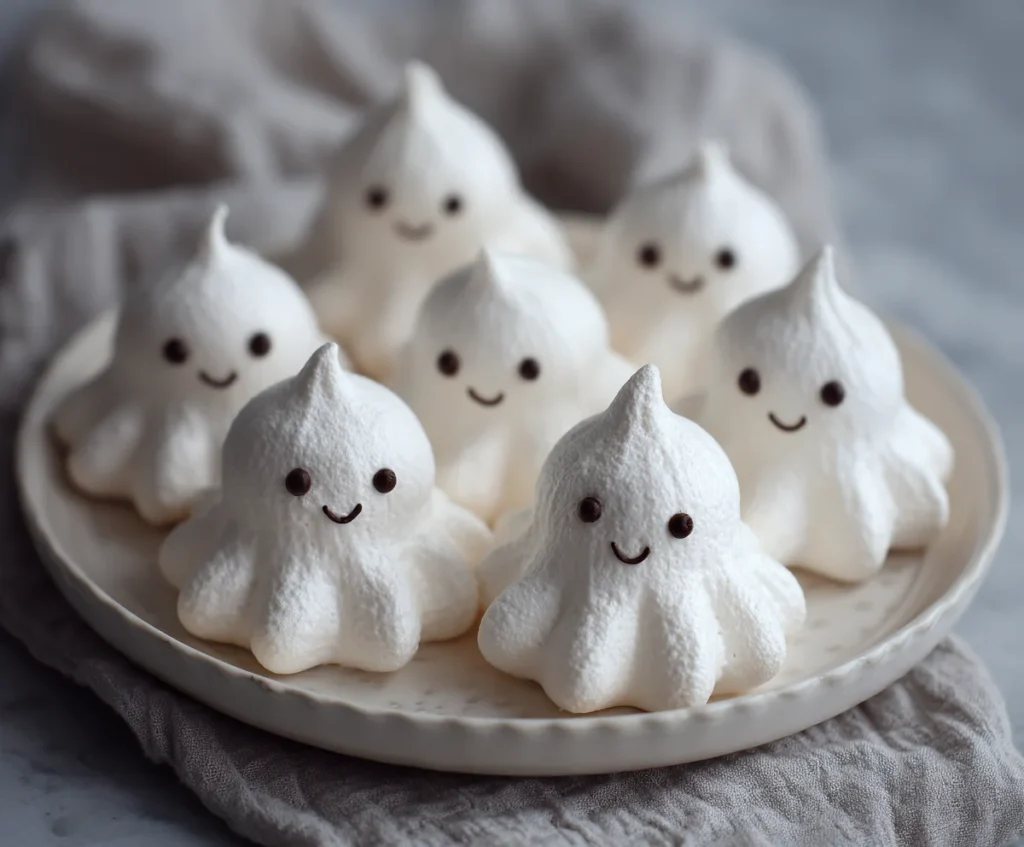
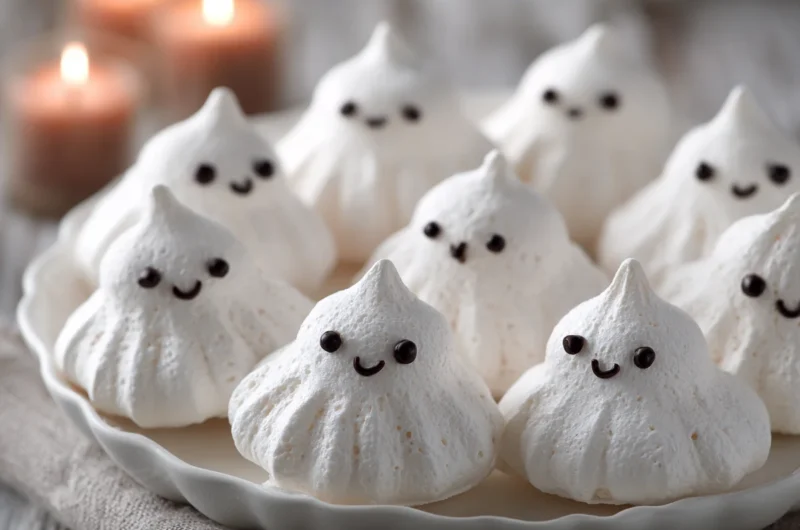
Whimsical, airy, and hauntingly adorable Ghost Meringues are the perfect treat to bring a touch of spooky charm to your Halloween table. Made from just a few simple ingredients, these melt-in-your-mouth sweets combine elegance with a playful twist. As an expert chef, I’ll guide you through each step to achieve glossy, crisp meringues that hold their shape beautifully all while adding a ghostly flair that will delight guests of all ages.
Ingredients List
- 3 large egg whites (room temperature)
- ¾ cup (150 g) superfine sugar
- ¼ teaspoon cream of tartar (or ½ teaspoon lemon juice)
- ½ teaspoon pure vanilla extract
- Black edible gel or melted dark chocolate (for eyes)
Step-by-Step Instructions
Step 1: Preheat and Prepare
Preheat your oven to 200°F (90°C). Line two baking trays with parchment paper. Ensure your mixing bowl is completely grease-free any oil residue can prevent your egg whites from whipping properly.
Step 2: Whip the Egg Whites
In a clean bowl, whisk the egg whites on medium speed until they become frothy. Add the cream of tartar and continue whisking until soft peaks form.
Step 3: Add the Sugar Gradually
Increase the mixer speed to high and slowly add the sugar, one tablespoon at a time. Beat until the mixture becomes stiff, glossy, and smooth this usually takes 5–6 minutes. Check by rubbing a little between your fingers; it should feel silky, not gritty.
Step 4: Add Vanilla and Shape the Ghosts
Gently fold in the vanilla extract. Transfer the meringue into a piping bag fitted with a round tip. Pipe tall ghost shapes a swirl at the bottom tapering to a point at the top onto the prepared trays.
Step 5: Bake Slowly
Bake for 1½ hours, or until the meringues are firm and lift easily from the parchment. Turn off the oven and let them cool inside with the door slightly ajar for another hour. This helps them dry out perfectly without cracking.
Step 6: Add the Ghostly Faces
Once cooled, use a fine brush or toothpick dipped in black edible gel or melted chocolate to create small eyes and spooky expressions. Let them set before serving or storing.
Cook Time
Total Time: 2 hours 30 minutes (including cooling)
Active Time: 20 minutes
Servings
Makes approximately 24 ghost meringues
Nutritional Information (approx. per serving)
- Calories: 25 kcal
- Fat: 0 g
- Carbohydrates: 6 g
- Protein: 0.5 g
- Sugar: 6 g
Storage Instructions
Store the cooled meringues in an airtight container at room temperature for up to 5 days. Avoid humidity moisture will soften them. For longer storage, you can freeze them for up to 1 month in a sealed, layered container with parchment paper between layers.
Suggestions
- For an elegant twist, dip the bases of your ghosts in melted dark chocolate.
- Add a pinch of pumpkin spice or cinnamon to the meringue for a seasonal aroma.
- Serve them perched on cupcakes, cakes, or a Halloween dessert platter for a charming effect.
Seasonal Relevance
These Ghost Meringues are a Halloween favorite, but they also suit autumn celebrations and themed parties. Their airy sweetness pairs beautifully with spiced fall drinks like hot cocoa or pumpkin chai. Kids adore them, and adults appreciate their delicate texture and professional finish.
Conclusion
Creating these Homemade Ghost Meringues is a delightful blend of artistry and precision. With just a few ingredients and careful attention, you can craft ghostly treats that impress both visually and in flavor. Whether for a festive table centerpiece or a playful dessert spread, these meringues prove that simple techniques can deliver hauntingly beautiful results.
Ghost Meringues Recipe
24
servings20
minutes1
hour20
minutes25
kcalThese Homemade Ghost Meringues are light, crisp, and delightfully spooky perfect for Halloween or fall celebrations. Made with just egg whites, sugar, and a touch of vanilla, they’re easy to whip up yet impressive enough to steal the show at any dessert table. A fun, family-friendly recipe that’s both elegant and festive!
Ingredients
3 large egg whites (room temperature)
¾ cup (150 g) superfine sugar
¼ teaspoon cream of tartar (or ½ teaspoon lemon juice)
½ teaspoon pure vanilla extract
Black edible gel or melted dark chocolate (for eyes)
Directions
- Preheat oven to 200°F (90°C) and line two baking trays with parchment paper.
- In a clean, grease-free bowl, beat the egg whites until frothy. Add cream of tartar and continue whisking until soft peaks form.
- Gradually add sugar, one tablespoon at a time, and beat until stiff, glossy peaks form. The mixture should feel smooth, not gritty.
- Gently fold in vanilla extract. Transfer meringue to a piping bag with a round tip.
- Pipe small ghost shapes onto trays, tapering each to a point.
- Bake for 1½ hours until firm. Turn off the oven and let cool inside with the door slightly ajar for 1 hour.
- Once cool, use black edible gel or melted chocolate to draw ghostly faces. Let set before serving.
Recipe Video
Notes
- Ensure no egg yolk gets into the whites even a drop can ruin the meringue.
- Avoid making meringues on humid days; moisture prevents them from drying properly.
- For added flair, dip the bottom of each ghost in dark chocolate once cooled.
- Store in an airtight container at room temperature for up to 5 days, or freeze for 1 month.
FAQs
Q1: Can I make meringue ghosts without a piping bag?
Yes! You can spoon small dollops of meringue onto parchment paper and use the back of the spoon to shape them into ghostly forms. They’ll look charmingly rustic.
Q2: Why did my meringues turn sticky after baking?
Sticky meringues usually indicate high humidity or under-baking. Always bake them low and slow, and let them cool in the oven to remove any residual moisture.
Q3: Can I color the ghosts?
Absolutely. Use a gel-based food color (not liquid) to tint your meringue before piping or dust them with edible shimmer for a magical ghostly glow.